Enabling DMA for hard drives (Windows XP)

January 21, 2008

Your PC can be slow for a number o reasons, including spyware other kinds of malware. But one of the often overlooked reasons is that DMA may be disabled for your hard drive. Windows sometimes disables DMA support for unclear reasons. Here’s how you turn it on again.

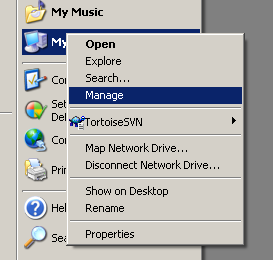
Right click My Computer and click Manage
Right click My Computer, either in your Start menu or on your desktop, and click Manage.

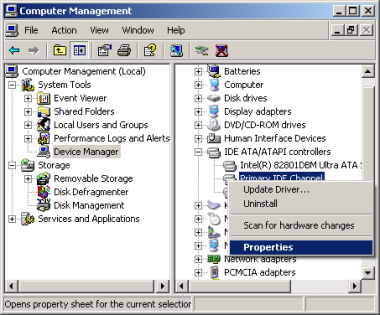
Click Device Manager, IDE ATA/ATAPI controllers, right click Primary IDE channel and choose Properties
Click Device Manager, IDE ATA/ATAPI controllers, right click Primary IDE channel and choose Properties.

dma_02_primary-ide-properties.png
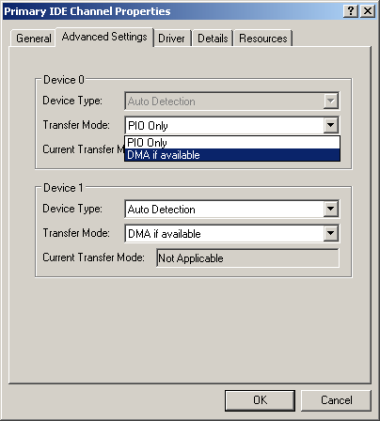
In Properties, click the Advanced Settings tab. If transfer Mode says PIO Only, DMA has been disabled. If so change it to “DMA if available”. Repeat for Device 1, and Secondary IDE Channel if needed. When prompted, reboot.


Windows file explorer crashes when selecting video files

December 27, 2007

Problem: Windows’ explorer crashes when opening or selecting a video file, or even just opening a folder containing video files.
Solution: Start > run > regsvr32 /u shmedia.dll
Then restart explorer.exe
Simplest way: Log out/log in or reboot computer.
More complicated way: Press ctrl+alt+delete or ctrl+shift+escape to bring up the task manager. Kill the explorer.exe process. Click File > New Process (Run) and enter explorer


String reverse prototype function in Javascript

December 27, 2007

Svendtofte.com has a list of useful Javascript prototype methods inspired by functional programming. (Lovely)
But there’s one of his prototype methods that I have an opinion on, his string reverse method:

String.prototype.reverse = function() {
    var s = "";
    var i = this.length;
    while (i>0) {
        s += this.substring(i-1,i);
        i--;
    }
    return s;
}

It’s a classic C style string reverse method. My suggestion is instead this:

String.prototype.reverse=function(){
       return this.split("").reverse().join("");
}

What does it do?
x=”nitro2k01″.reverse() for example does this: this.split(“”) splits the string into an array, where every element is one character of the string. “nitro2k01” in the example becomes the array [“n”,”i”,”t”,”r”,”o”,”2″,”k”,”0″,”1″]. .reverse() in turn reverses the array, so the new array becomes [“1″,”0″,”k”,”2″,”o”,”r”,”t”,”i”,”n”]. Lastly .join(“”) turns the new array back into a string, “10k2ortin”, which is returned.

I like my function better because it has a more functional look, re-uses builtin JS functionality and possily is faster. (Although I’ll have to investigate the last claim more thoroughly.)


PHP: Using print_r for debugging

September 27, 2006

When programming PHP you sometimes need to look at http post or get data (That is, a the data submitted in a form) The simplest way to do this is to to use php’s builtin function print_r, which will parse any array and print the indeces and array values. For post and get data, you should look at the corresponding array, $_POST and $_GET, respectively.

There are two things worth noting about print_r. First thing is that print_r is a regular function, and not a language construct like echo and print. Without going into detail, this means you need to put parentheses around the argument when calling it, unlike for print/echo. Second thing worth noting is that print_r outputs raw text. This includes line breaks, which will normally be parsed as spaces by by your browser, which will make the data almost unreadable. The easy solution to this is to put a pre block around the data. So we arrive at this code:

<?PHP
echo '<pre>';
print_r($_GET);
echo '</pre>';
?>

Here’s a sample output:

Array
(
    [userid] => 23
    [password] => qweasd
)

However, as mentioned, print_r can print any array. Except for your own arrays, these might come in handy when debugging: $_GET/$_POST (As mentioned above) $_SERVER (A lot of information) $_SESSION (Session data, if your application uses sessions) getallheaders() (Shows all http headers. Call it like this: print_r(getallheaders()); ). There are probably even more useful arrays than these, but they were the ones that I came to think of now. Happy debugging!

Btw, the blog idfw06 linked to me, so I’d better link back. (:


Tip of the day: Use png instead of gif!

September 2, 2006

Ok, I made a mistake. I started this blog right before I went on vacation, which was perhaps not the smartest thing I could do, since the little stream of readers I had thought I had given it up when I suddenly stopped posting. Next bad thing is that I had a laptop with me on my vacation to, among other things do some blogging drafts. And right after I came home the hard drive crashed.

So here we are, two months after my latest post. As a new reader, this might be the first post you read, so here’s a little explanation what this blog is aout. Packets of Knowledge is, as the name might suggest, meant to be a blog with small tips and tricks to specific problems. Either problems I’ve faced myself, or answers to questions I’ve answered in forums. Particularly the latter, since some questions seem to appear over and over, so if that instead of writing a whole new answer, I can link back to this blog. It’s also meant to be a refernce for myself as I build it up.
The topics you’ll see on this blog will mainly be web development, but also other sorts of development and fixes to annoyances in programs and operating systems.

So, back on-topic: All developers and most computer users knows what gif is. It’s a file format for storing image data. It’s the per se standard image format for the web, together with jpeg. Both gif and jpeg are destructive, but in different ways. Gif has a limited color depth. A gif image can store no more than 256 unique colors. Storing a photo in gif will give it a low quality where the 256 colors are used in patterns to give the illusion of the original colors. But other than that gif won’t destroy your image, so images which already has less than 256 unique colors will look ok. This may include graphs and sketches with few colors.
Jpeg on the other hand will not decrease the color depth, but instead slice the image into small blocks and look for blocks that resemble each other and exploit that to be able to compress the file. This works good for photos which can be compressed with jpeg with a good ratio. Jpeg effectively does what it should for real color images, but tends to destroy images with blocks of solid colors, or images with text in them.
So why replace gif with png? Png is probably most famous for its ability to store an alpha channel – a way of giving the image a semi-transparent look. But png can store store 256 color images as well, just like gif. Only with the difference that png will make the image file smaller than the corresponding gif file, but still look the same. Another argument to leave the gif format behind is that it used to be patented. Today, the patent has expired, but still I’d recommend a switch.

Png can also store full color images, optionally with an alpha channel as mentioned above, but the biggest advantage is that png , even for a full color image, is totally undestructive. That makes it the web’s only standardized, full color, non-destructive image format.
While it is true that one major browser still doesn’t support png images with an alpha channel without extra effort. (IE6; this will be fixed in IE7) But every major browser has support for png without an alpha channel since years ago. So next time you’re about to save a gif file, save it as png and make the world a better place.


Getting rid of borders around images in links

July 4, 2006

Some browsers put a border around images that happen to be inside a link. The standard solution to this has been to place a border=”0″ attribute to every affected image. Myself, I usually solve that problem by adding this CSS code to my global css includes:

a img {border: none;}

What border: none; does should be pretty clear to most people, but a img might not. I remember I was pretty confused the first time I saw it. Back then I thought it applied the attributes both a and img tags. (You can do that by comma separating identifiers btw) a img is an identifier that applies the CSS attributes to all img tags that are children of (In other words situated inside) to a tags. This goes for children of all depths, ie even a child of a child of child of an a tag.

If you want the CSS properties to apply to only direct children, you can use >

p>blockquote {font-size: 0.8em;}

This CSS code will apply a smaller font size for every paragraph which is a direct child of a blockquote tag.


Preventing search engine indexing

July 4, 2006

There’s a lot of talk today about search engine optimization, ie trying to rank a page higher in search engines by using special techniques. I believe much of the time doing this is wasted. But not all is about getting people to find stuff on your page, sometimes you want people not to find some things, and that is what this post is about.

There are three main ways of preventing search engines from indexing certain pages, robots.txt, meta robots tags and the rel=”nofollow” attribute for links.

robots.txt

robots.txt is a small text file which you place in the server root, eg http://www.testdomain.com/robots.txt. Note that putting in another directory than the root won’t work. http://www.testdomain.com/folder/robots.txt will in other words not be detected by search engine spiders. robots.txt can contain a number of commands. The commands of interest for indexing prevention are User-agent, Disallow and Allow. Every robots.txt should start with a User-agent command which decides which Agent (In other words search engine spider) should be affected by the following commands. Generally you want to use the same rules for all engines, which is represented by the command User-agent: *

Next up is the Allow and Disallow commands. URL’s followed by the Allow command will be crawled and indexed, while those following Disallow will not. Here’s a simple example of a robots.txt file disallowing one directory.

User-agent: *
Disallow: /secretdir/

This will tell all robots to exclude http://www.yourdomain.com/secretdir/ and any files and subdirectories in that folder.

What about the Allow command then? The Allow command can be combined with Disallow to create custom rules. Say you want to have http://www.yourdomain.com/secretdir/publicpage.html indexed, but nothing else in the directory http://www.yourdomain.com/secretdir/. Then you would first have an Allow command to allow the particular page to be indexed, and then a Disallow command to prevent the rest of the directory to be indexed.

User-agent: *
Allow: /secretdir/publicpage.html
Disallow: /secretdir/

Which touches the subject of precedence. In which order are the rules applied? The RFC standard says that the first applicable rule should be used. Consider this excample:

User-agent: *
Allow: /
Disallow: /secretdir/

According to the RFC standard this example would not do what the webmaster wanted, that is allow everything except http://www.yourdomain.com/secretdir/. Following the RFC rules, everything, including http://www.yourdomain.com/secretdir/, would be indexed. This is so because the first applicable rule would be applied, in this case Allow: /, since secretdir is situated under /. However, Google has chosen to misinterpret the rules so that the most specific rule is applied first, in this case Disallow: /secretdir/ since it’s more specific than Allow: /.
But if you want to play it safe and make sure all search engines interpret the rules correctly, you should place the Disallow rule in the example above the Allow rule.

But since, as shown above, robots.txt files cannot be stored in subdirectories, this solution cannot be used for some cheap/free web hosts where you do not have access to your own domain. Which leads us to:

Meta tags

Meta tags are tags containing meta data, that is data about the document in they are placed in. Meta tags can specify alot of different information, but the tag of interest for this post is the robots tag. It can take on four values, which can be combined. This an example on what the HTML code for the tag could look like:

<meta name="robots" value="noindex, nofollow" />

This code will tell the robot to neither index the page nor follow links from it.
The four values the value attribute can take on are {noindex, nofollow, index, follow}. The index attribute explicitly tells the robot to index the page it appears on. The follow attribute explicitly tells the robot to index any outgoing links from thepage it appears on. The no-prefixed attributes explicitly tells the robot not to do the respective thing.

Despite what some SEO freaks say, you typically never need to add the index attribute; the robot will index the page by default. The only exception might be if you have added noindex but want links to be followed. In that case you might want to add follow to make sure that links are followed, but even in that case that shouldn’t be necessary.

So, the meta robots method gives control over how each html page is treated by search engine robots, but the last methods offers even more fine grained control.

rel=”nofollow” attribute for links

This last attribute lets you control individually for every link whether it should be followed by a search engine robot. You could use this attribute to prevent that a certain page on your site gets indexed, but that’s a bad way of doing it. As long as there’s another link pointing to that page it will be indexed anyway. Use one of the other methods instead to be certain.

The real beauty with attributing links with rel=”nofollow” is that robots pretend that the link doesn’t exist. Since Google and other search engines rank a page based on how many times it has been linked to, this is an effective way of linking to a page without supporting it by increasing its rank.

<a href="http://www.thatpageidontlike.com" rel="nofollow">link me beautiful</a>

If you have thoughts or questions about this post, don’t hesitate to leave a comment below.

Gmail and mailing lists

July 3, 2006

A great deal of my e-mail volume consists of traffic to and from mailing lists. I think mailing lists is a great way of communicating. This is so because all traffic will reach you, as opposed to eg forums where you’re likely to miss something. It is of course for the same reason some people don’t like mailing lists, because all messages appear in an utter mess.

Unless you use gmail of course! Some (non-tech) people seem to scared by the conversation views in gmail. They might just not get it (Where are my messages?) or they might not see the point in it. And true enough, if your average e-mail conversation consists of 2-3 messages, say 1 message, and one or two replies, there might not be much point in it.

But the conversation system has the advantage of keeping messages in a context. Even there’s a month between every reply, the messages are stuck together, so you can always have a quick look in the history. Which leads us to the search function, which makes the conversation view even more useful. Say you look for something and find messages from two years ago. Then it might be even more valuable to have the messages stacked in conversations.

I can without doubt say that the way gmail works has encouraged me to join more mailing lists.

But enough talk. Now for some hands-on tips on how to make gmail more suitable for mailing lists use.

Personal level indicators

Gmail Personal Level Indicators

Go to settings and activate this function. As the text says, this function will show indicators to show when a mail is addressed to you personally.When this setting is activated, if an e-mail has a double arrow it’s either a private conversation, or a group conversation where someone has decided tosend you a private mail. A single arrow means that some mail in the conversation was sent semi-personal, such as if your address is CC’d.

Personal Level Indicators in Practice
In this example, the topmost mail is one that I sent and got a reply to. The second one is a mail that I got a CC copy of. And the last one is a regular list conversation.

Here’s a wish though: When new mail arrives to a list conversation that has been marked with a double arrow, the whole row becomes bold marked. However, I’d want the arrow to be bold only if a new private mail has arrived, so I don’t get false alarms.

Filters and labels

Most groups put a small “banner” before the mail title, ie an abbreviation for the group’s name in brackets, such as [sxdm] Mail title. But some don’t. In these cases you can create a filter which will put a tag on conversations from a certain group.

The first thing you must do is find something all mails from a certain list have in ommon. Usually a mailing lists either set to or from to the lists address. This is individual for every list, so you’ll have to look for yourself.

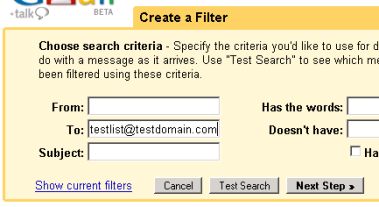
Start off by clicking Create a filter near the search button. Assume that you somehow have deduced that all messages from the list in question have the address testlist@testdomain.com as their to address. So you enter that to the appropriate field. This might also be a good opportunity to test the filter.

Filter step 1

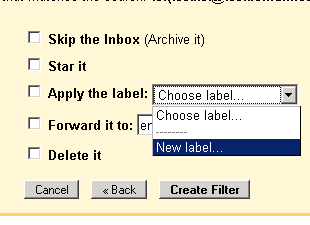
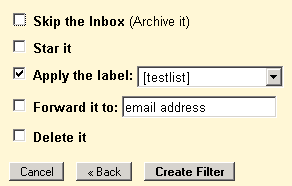
On the next page click Choose label and choose New label. Enter the name, preferably in brackets to it’ll fit in with other group names.
Filter step 2
Filter step 3

If everything went well, you will now have a working filter which will tag all incoming messages.

Filter step 4

Here’s a sample image of an e-mail with a tag, so you know when you got it right.

Filter step 5

That’s all for this time. If you know any more useful gmail techniques, please leave a comment!


Numeric array sort in Javascript

July 3, 2006

(This is a response to Hakan Bilgin’s post Javascript Array: Sorting on his blog challenger)

Hakan presents a function for sorting a javascript array numerically, as opposed to alphabetically ([1,2,3,21].sort() => [1,2,21,3]) Such functions have existed about as long as people have needed to sort javascript arrays. However hakan’s function introduces two new features, namely the ability to choose sort order, (Which btw is defaulted to descending order in his function) and that it takes care of non-numerical objects, such as strings, in the array, and puts them in the higher end of the sorted array.

One thing I don’t like about his implementation is that it doesn’t work well with decimal numbers. ([1,2.4,2].sort_int(1) => [1,2.4,2]) 2.4 is simply rounded to 2 by parseInt and will not be guaranteed to end up on the right side of 2. But of course, sort_int was not meant to be used this way.

Anyway, I propose this code to the job:

Array.prototype.numsort=function(d){
    var d = d || -1;

    return this.sort(function(a,b){
        if (isNaN(a-b))
            return (isNaN(a)?1:-1)*d;

    return (a-b)*d;
    });
}

// Test the code
alert([1, 12, "a", 3, 29, 34, 4, 4.5, 4, 6, 46].
    numsort(-1));

I guess that’s it. If there’s anything fundamentally wrong with this code, please let me know. 🙂


Welcome to Packets of Knowledge

June 16, 2006

Welcome to Packets of Knowledge. This will be a blog with tips and tricks about different things, mainly related to web technology, both for developers and plain users.